
See your Owner's Manual for complete safety, set-up and installation procedures.
1. Connect Torch
When using an air-cooled torch, use the adapter from your accessory package and plug the torch into the front of your machine. Also connect your gas hose and regulator.
2. Connect Remote Control
Plug your foot pedal or fingertip control into the machine.
3. Connect Work Clamp
Plug your work clamp (sometimes referred to as a ground clamp) into the machine. Clamp the other end to your work piece or work table.
4. Select Polarity
For aluminum welding, switch your amperage setting on the front panel to AC. For steel and steel alloy welding, switch your amperage setting to DCEN. (For Stick welding, switch your amperage setting to DCEP.)
5. Prepare Tungsten
Grind your tungsten to a point. When welding on aluminum, the tungsten will begin to form a ball. If the ball grows to the same diameter as your tungsten, repoint the tungsten. Grind in the long direction and make the point roughly 2-1/2 times as long as the diameter.
Use a 200 grit or finer grinding wheel. Do not use the wheel for other jobs or tungsten can become contaminated causing lower weld quality.
6. Assemble Torch
Loosen the back cap and remove the 3/32" diameter tungsten from your torch. Remove the nozzle and copper collet pieces from your torch. Put the collet and collet body back into the torch and tighten. Put the nozzle back onto the torch.
7. Install Tungsten
Place the tungsten into the collet. Leave about 1/8 to 1/4 in. sticking out of the collet (not more than the diameter of the cup). Tighten the back cap.
8. Check and Connect Power
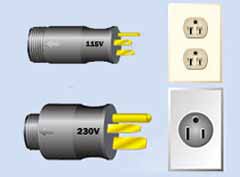 Make sure the power supply you are connecting to matches the rating of your machine (see rating label on unit). If your machine is supplied with a plug, plug it into the appropriate power outlet when you are ready to begin welding.You may need to purchase a plug to match your receptacle. If your machine is not supplied with a plug, connect according to the procedure provided in the Owner's Manual. Make sure the power supply you are connecting to matches the rating of your machine (see rating label on unit). If your machine is supplied with a plug, plug it into the appropriate power outlet when you are ready to begin welding.You may need to purchase a plug to match your receptacle. If your machine is not supplied with a plug, connect according to the procedure provided in the Owner's Manual.
|